
This post is part of iPhone Life‘s Tip of the Day newsletter. Sign Up.
Want to know how to screen record with sound on an iPhone or iPad? It’s easy to screen record with audio on an iPhone or iPad. Screen recording, sometimes called screen capture, is a feature that allows you to record video and audio playing on your device or externally. If you want to record your screen, you don’t need a special screen recorder app or audio recording software. Apple offers a free tool for iOS and iPadOS that you can add to your iPad or iPhone’s Control Center to screen record with sound. We’ll show you how to enable screen recording in your Control Center, and how to turn on screen recording. If you’re wondering, “why can’t I screen record with sound?” we’ll answer that question, too. An iPhone screen recording will record internal audio by default (if your iPhone’s ringer is on). You can also record your voice during the screen recording. Let’s get started with how to screen record with audio or without audio, including system sounds and external sounds. Here are all the answers you’ve been looking for to the question, “how do you screen record?”, whether you have an older iPhone like an iPhone 6 or 7, or a newer iPhone like the iPhone X, 11, XR, or SE.
Related: How to Quickly Take a Screenshot on Any iPhone
How to Screen Record with Sound on Your iPhone & iPad (Audio & Video, Internal Audio & External)
Want to learn how to record your screen, ether video, audio, or both? Here’s how to do screen recording, and the steps you need to take to get ready to screen record, including adding the Screen Record control to your iPhone and iPad Control Center, how to turn on screen recording, and all about iPhone screen recording with sound. We’ll show you how to screen record with internal audio on an iPhone, including internal audio, and how to screen record with external sounds or audio like a voiceover, or both internal and external audio.
What’s in This Article:
- Can I Screen Record on My iPhone, iPad, or iPod touch?
- How to Add Screen Record to the Control Center on Your iPhone & iPad
- Screen Recording Audio on Your iPhone: Turn Voice Recording & App Sounds Recording On & Off
- How to Record Sound when Recording Your iPhone Screen
- Can I Screen Record from YouTube, Spotify, Apple Music & Amazon Music?
Can I Screen Record with Sound on My iPhone, iPad, or iPod touch?
If you have an iPhone or iPad that’s running iOS 10 or earlier, you can’t use the methods in this article to screen record, but you can use Quicktime. You can use the screen record feature on any iPhone or iPad that can run iOS 11 or later, or iPadOS. Here’s a list of every iPhone and iPad that can screen record.
iPhone
- iPhone 5s
- iPhone SE
- iPhone 6 Plus
- iPhone 6
- iPhone 6s Plus
- iPhone 6s
- iPhone 7 Plus
- iPhone 7
- iPhone 8 Plus
- iPhone 8
- iPhone X
- iPhone XS
- iPhone XS Max
- iPhone XR
- iPhone 11
- iPhone 11 Pro
- iPhone 11 Pro Max
- iPhone SE (second generation)
iPad
- 12.9-inch iPad Pro (4th generation)
- 12.9-inch iPad Pro (3rd generation)
- 12.9-inch iPad Pro (2nd generation)
- 12.9-inch iPad Pro (1st generation)
- iPad Pro 11-inch (2nd generation)
- iPad Pro 11-inch (1st generation)
- iPad Pro (10.5-inch)
- iPad Pro (9.7-inch)
- iPad Air 4
- iPad Air 3
- iPad Air 2
- iPad Air
- iPad (8th generation)
- iPad (7th generation)
- iPad (6th generation)
- iPad (5th generation)
- iPad mini 5
- iPad mini 4
- iPad mini 3
- iPad mini 2
iPod touch
How to Add Screen Record to the Control Center on Your iPhone & iPad
This article focuses on how to screen record with sound on an iPhone, but let’s quickly recap how to record your iPhone screen. To record your iPhone screen, you need to add Screen Recording to the Control Center. This will only work with an iPhone running iOS 11 or later. To add Screen Recording to the Control Center:
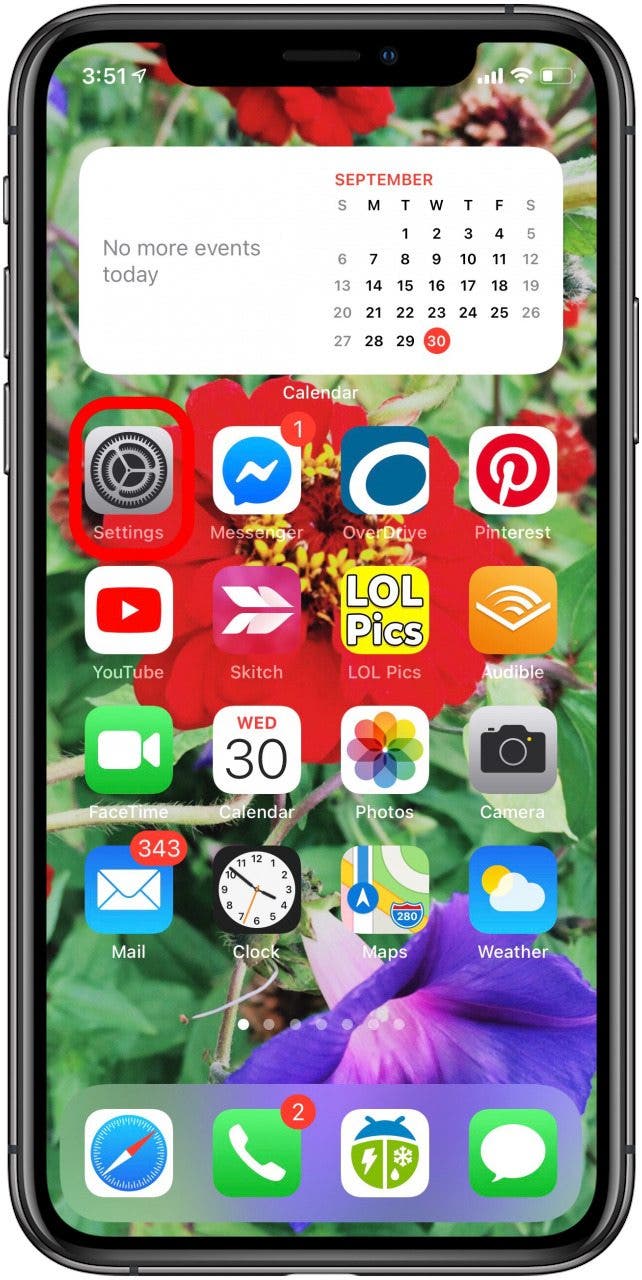
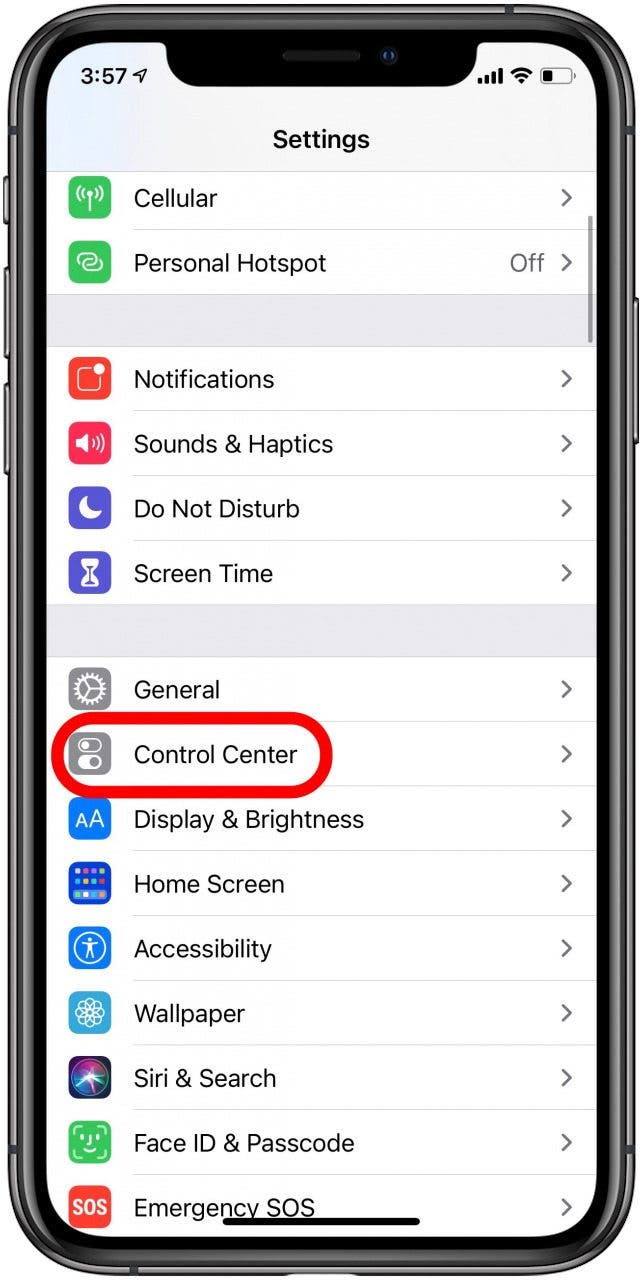
- Open the Settings app.
- Tap Control Center.
![iphone settings app]()
![iphone control center]()
- Tap the green circle next to Screen Recording.
![add screen recording to control center]()

Now you can record your screen; however, by default, your iPhone will record the screen without any external sounds. If you want your iPhone to also record sound during the screen capture, use the how-to below to capture both your iPhone’s screen and audio.
How to Screen Record with Audio on Your iPhone & Turn Voice Recording & App Sounds Recording On & Off
Let’s answer the question of “how do I record my iPhone screen with sound?” In this section, we’ll summarize how to record (or not) your voice along with your iPhone’s native sounds. This is a very important part of recording your screen with sound, because we need to clarify what you mean by sound.
- If you want to record your voice while screen recording on your iPhone, you want the Microphone turned on (*Notethis will also record in-app sounds).
- If you only want to record the sounds of an app, you want the Microphone turned off, but your iPhone’s ringer turned on.
- If you turn the Microphone off and have your ringer off (silent), the screen recording will be silent.
To turn your microphone off and on for the app you want to record, open your Settings app, tap Privacy, tap Microphone, and toggle on any app you’d like voiceover capability for while screen recording. Toggle off the app if you don’t want voiceover or ambient noise recorded along with your screen recording. You can change your microphone settings from screen recording to screen recording as desired.
How to Screen Record with Audio on Your iPhone & iPad
Now let’s get into the nitty-gritty. To record ambient sound, like your own voice, during a screen recording, follow these steps:
- Open the app you’d like to record in and begin the activity or media you’d like to record.
- Open the Control Center: On the iPhone X and later or an iPad with iOS 12 or later, or iPadOS, swipe down from the upper-right corner of your screen. On earlier iPhone versions, swipe up from the bottom of the display.
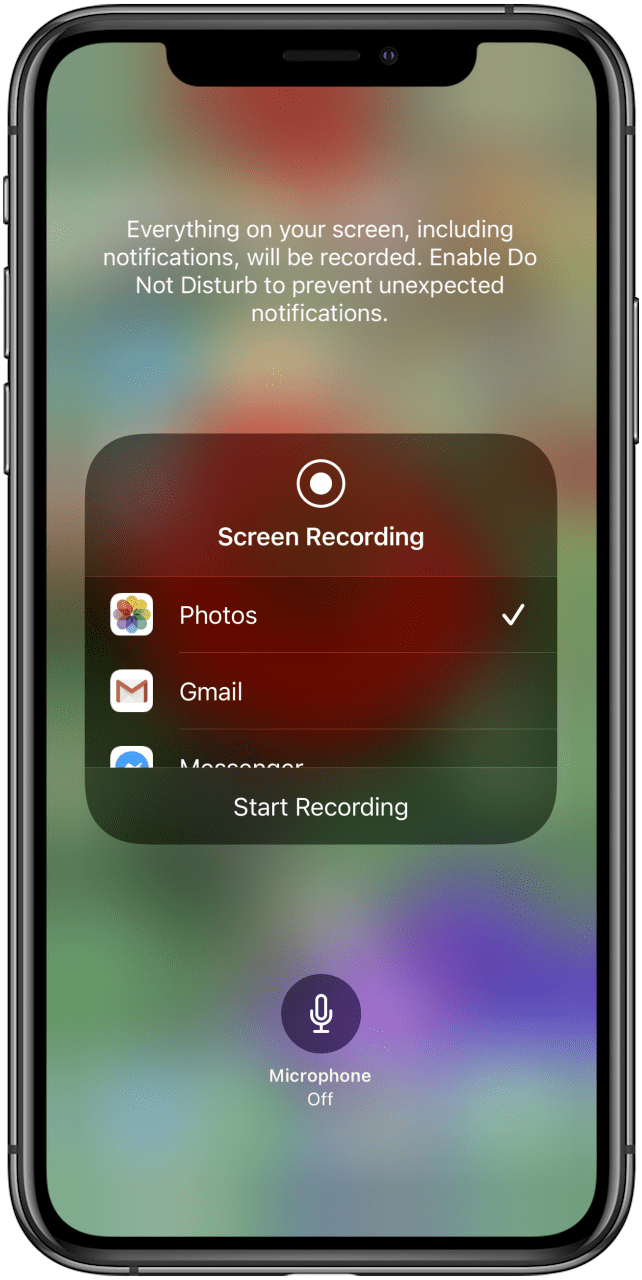
- 3D Touch or long press the Screen Record icon.
- Tap the app where you want your screen recording saved.
![open iphone control center]()
![iphone screen recording options]()
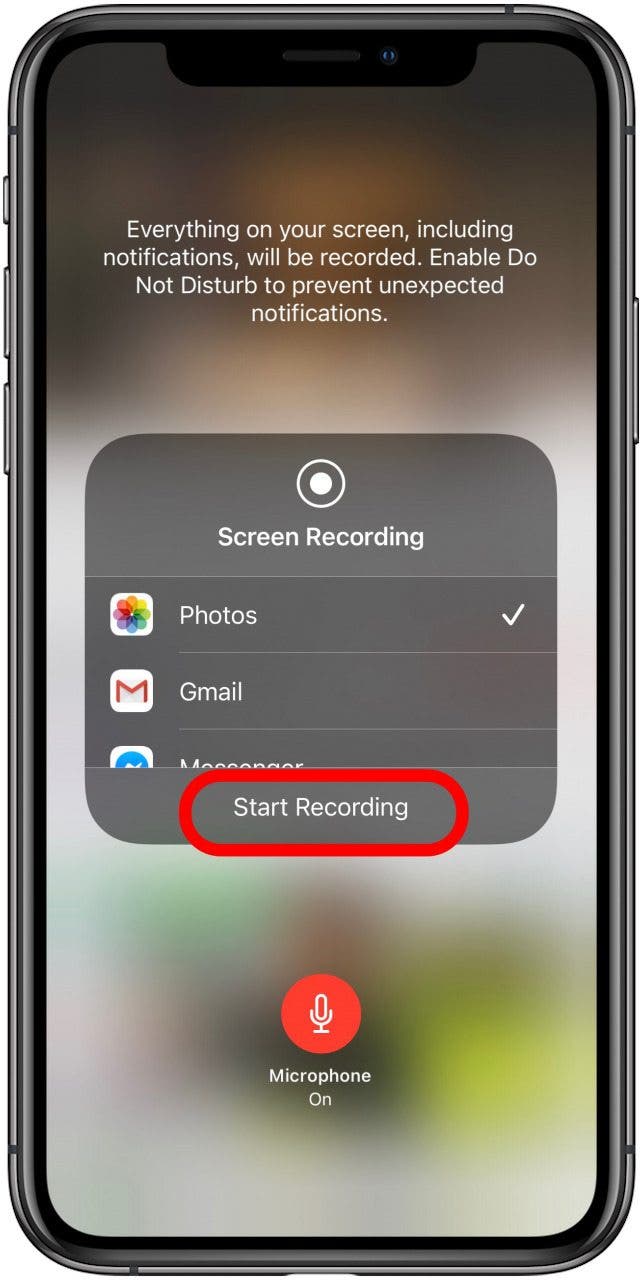
- Tap Start Recording.
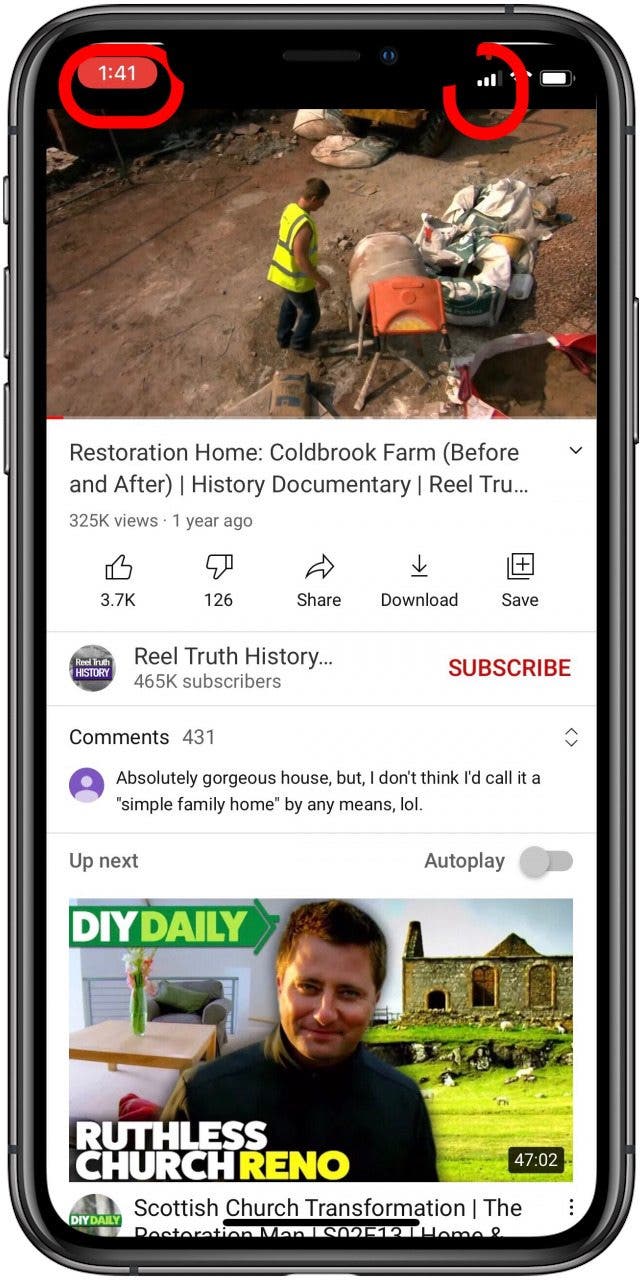
- Your iPhone will record the screen, your voice, and any other ambient audio. You’ll have to close the Control Center to reveal the app that’s being recorded, or the only recording you’ll get will be of the screen recording controls.
- The clock in your app will have a red background, indicating sound is being recorded, and you’ll see an orange dot in the upper-right corner, indicating the app is using the microphone.
![tap start recording to begin screen recording]()
![recording in youtube app]()
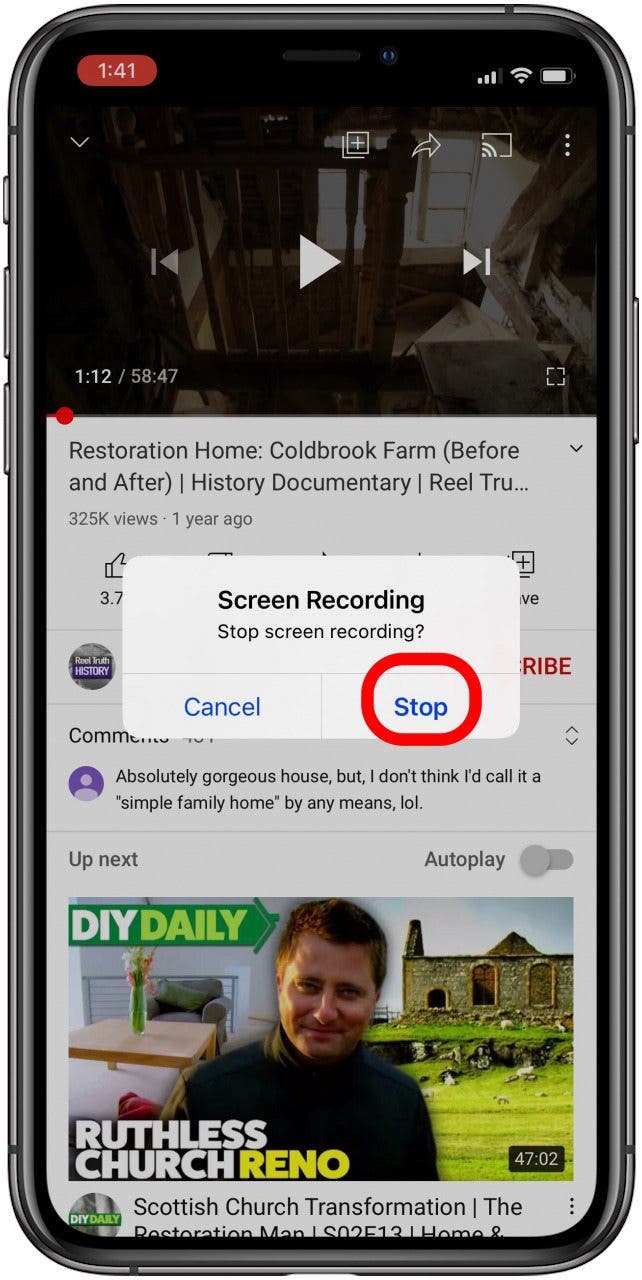
- When ready to stop recording, tap the clock at the upper left of the screen.
- Tap Stop to end the screen recording; the recording will be saved to the location you selected earlier.
![stop recording]()

How to Screen Record with Sound from Apple Music, Spotify, Amazon Music, or YouTube
How do you screen record in Apple Music? Well, you can’t use the screen record feature with this service. When you begin Screen Recording, if Apple Music is playing, then the sound will stop until you cancel the recording. There used to be a workaround for this, but Apple has since fixed that bug. Basically, to keep a song forever, you’ll have to pay the licensing fees and buy it.
It’s worth noting that some third-party apps, such as Spotify and YouTube do not allow you to screen record in the free version, but in the premium version, you can screen record. You can also screen record content from Amazon Prime Video. While you can technically record songs and video content this way, the legality of doing so is a bit gray. Most likely, third-party apps will eventually build the same protections as Apple Music to prevent screen recordings of licensed content. Even so, it’s fun to play around to see what you can record on your iPhone as long as you know that some licensed materials might push the mute button as soon as you hit record. You might also be interested in learning different methods to screen share between your Mac, iPad and iPhone.
Top image credit: Real Life Design / Shutterstock.com
Master your iPhone in one minute a day: Sign up here to get our FREE Tip of the Day delivered right to your inbox.